Wednesday, March 24, 2010

Deals to Meals

When I left my full-time job on Baby's due date, I instantly became a more frugal person. We knew that money would be tight living on one income, and after cutting back on all of our little luxuries, I realized that the last area of our budget with any wiggle room was groceries. I got really into couponing. Did you know that couponing is a verb? To hard-core coupon ladies it is. You know the ones; the lady holding up the line at the grocery store while the clerk calls the manager over to argue about some restriction on triple coupon day. That was me, for a while. I followed Coupon Mom's system and even printed my grocery list (for visits to several different stores) on an excel spreadsheet every week.

As I learned more about cooking, though, I eventually gave up on clipping coupons. I discovered that the best way to save on groceries is to cook from scratch whenever possible. No coupon on canned beans will ever beat the cost of cooking dried beans. You'll never find a sale price on bread that's cheaper than your own homemade version. I'm sure I lose out on a couple awesome deals, but couponing is just not worth the headache anymore!

Having said all of that, though, I did just discover an intriguing new service called Deals to Meals. They, like several other services including Coupon Mom and The Grocery Game, help you create a shopping list by identifying items at their lowest sale prices. What makes Deals to Meals unique is that they also provide a weekly menu plan created with items currently on sale and some that may already be in your food storage. They also identify the quantity of each item you should purchase if you'd like to stock up on enough for one person or family for one month or even one year.


The cost of the service is $4.95/month, but I just signed up for their free 2-week trial to check it out. It seems like a good idea for those of us who are fed up with coupons but would still like to save on groceries. I'll let you know if I am sold!

Thursday, March 18, 2010

Composting in Suburbia

Any real gardener will be laughing out loud at this post. As well they should; we didn't do a single thing right with our compost pile. Even so, today I covered our vegetable garden area with rich, dark homemade compost! How did we do it?

Almost done spreading compost on the vegetable garden.

When we first moved here four years ago, Nick tore up a fair amount of our grass to make room for flower beds around the perimeter of our yard. He stacked the sod in a huge pile along the side of our house and called it "the compost pile". I wasn't convinced, though. Two years later it was still a huge pile of sod, hard as a rock and immovable. I knew that we'd have to get rid of this pile eventually if we ever planned to sell our house, so I got quotes from landscapers to find out how much it would cost to have it hauled it away. This pile is at least 4 feet wide by 4 feet tall by 8 feet long, and the estimates were around $500. Um, I guess we'll just have to keep our unsightly dirt pile!

Last summer, I decided to buy in to the whole "compost" plan. I started burying kitchen scraps and garden debris in the pile (as deep as I could to avoid attracting pests). I didn't touch it all winter because it was frozen solid. Then, this week...after a few days of Colorado sunshine...I poked my shovel into the pile and found the most loose, rich, dark soil! The pile is crawling with fat, well-fed worms. They've been hard at work! There are NO kitchen scraps remaining - and I even added watermelon rinds!

I thought I'd share this story to let you know that you don't have to do everything perfectly to compost. We never turned the pile and certainly didn't make sure we had the right combination of ingredients. All we did was give it time and let nature do all the work.

Usually, I load up my car with bags of manure to add to the garden every Spring. This year, I just had to transport compost from the pile to the garden. Now, all those juicy worms are loosening up the soil in my garden and I can't wait to start planting!

The pile is nearly gone, so we intend to build a simple compost bin in its place. That will make it easier to turn and manage the pile for next year. Do you have a compost bin? Any suggestions?

Monday, March 15, 2010

I LOVE Cloth Diapers!

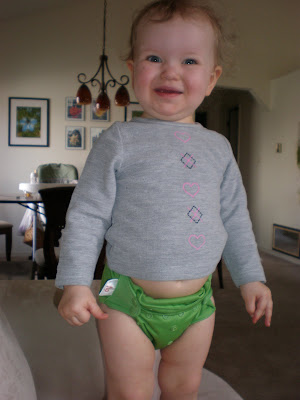
Baby has been wearing her new Flips cloth diapers for a few days now and so far...

No leaks!

No stains!

No lingering smells!

And they're as cute as can be!


Funny girl!

Because I only bought one Day Pack to start with, I've been laundering them every evening. I just ordered more and should be down to two loads of laundry per week once they arrive. Based on advice found online, I decided to start with the simplest possible laundry routine. That way, if we run into problems down the road, such as a lingering odor or stains, I will have plenty of tools available to try. I use the dry pail method, simply tossing used cloth inserts into her diaper pail (lined with a cloth bag) until laundry day. I start the load with a short/cold wash and a small amount of detergent (I use All Free & Clear because she has sensitive skin), followed by a hot wash and more detergent, and ending with an extra rinse. I lay the covers flat to dry and dry the inserts in the dryer, although I will hang them outside to dry in the summer.

If we run into problems, we'll try adding baking soda or vinegar to the wash, commercial stain and odor removers, and even hanging them in the sun for several hours (supposedly the best way to remove stains).

One thing that I was nervous about was...let's face it...getting solid waste into the toilet. Nasty. Well, I bought the bumGenius diaper sprayer and it works great! No dunking and swishing is necessary.


The diapers fit perfectly. They appear a bit more bulky than disposables when worn alone, but when worn under pants she doesn't look any different. In fact, she still fits into all her usual clothes, including jeans!

I also tried the disposable inserts, and they are OK. They seem a bit too thin, but we haven't had any leaks yet. Luckily, Flips covers can hold any brand of inserts, so if these don't work, we can always try another brand.

If you have any questions, I'd be happy to answer them. I think this system is going to really work for us and save us tons of money! Plus, it's nice to have a little less guilt about contributing so much non-biodegradable waste to our landfills :).

Wednesday, March 10, 2010

Baking Bread: My Routine

Before having kids, I would often daydream at work about all the things I would have time for as a stay-at-home-mom. I would go hiking, start a garden, take naps, and learn to bake bread from scratch. Now that I'm "living the dream", I've realized that I could have been enjoying fresh-baked bread all along. It's really not that difficult, and the health benefits and cost savings make it well worth my time. I bake all of our sandwich bread, dinner rolls, tortillas, hot dog and hamburger buns, and pizza dough. Now that I've been doing it for nearly two years, I've developed a pretty easy routine that I thought I would share with you. I'm not going to describe how to bake bread, as I am not in any way qualified to do so, but I will link to some of my favorite recipes and resources.


My Routine:
We usually go through two loaves of sandwich bread a week. We use it for toast, sandwiches (obviously), garlic bread, or a simple snack dipped in olive oil or spread with butter, jam, or Nutella. The most hands-on time consuming part of baking bread is assembling all of the ingredients, so every two weeks, I get everything ready for four loaves of bread. I start a double batch in my stand mixer and assemble all of the dry ingredients for another double batch in a freezer bag. I bake two loaves that day and store one in the freezer for later in the week. One week later, I already have a "kit" for another two loaves ready to go.

Baking a loaf of bread takes about three hours from start to finish, so it can easily be done in an evening. The basic process starts with about 15 minutes kneading the dough, 90 minutes rising, shaping the dough into a loaf, another 45 minutes rising, and finally about 30 minutes baking. That sounds like a lot of time, but really, it's only a few minutes of hands-on work (especially if you have a stand mixer or bread machine to do the kneading!).


Equipment:
I started off baking bread with nothing more than one bread pan. I kneaded by hand and used store-bought whole wheat flour. Eventually, I borrowed my parent's bread machine to do the kneading for me. Over the past two years, though, I have made two major purchases that I LOVE. Both are rather expensive items but well worth the initial investment because I use them all the time and they should last for many years. (Plus, if you consider that my bread costs about $0.50/loaf to make, and store-bought whole wheat bread goes on sale for about $2.50/loaf, I've already saved about $416 in the two years I've been baking bread, not even counting the other bread items I make).
  • Grain Mill: Whole grain flour goes rancid very quickly, but you can preserve the most health benefits by grinding your own flour immediately before use (which is why I keep the dry ingredients kit in the freezer). I bought a WonderMill Electric Grain Mill ($269.95). It's fast, quiet, and easy to clean. I can grind whole wheat berries (or any grain, for that matter) into regular flour, bread flour, or pastry flour.
  • Stand Mixer: This is a new addition for me. We bought a Kitchenaid Stand Mixer (about $250). I prefer a stand mixer to a bread machine because I am able to knead dough for two or more loaves at once. Of course, I use this for cookies and other treats, too!
Ingredients:
Since we go through bread ingredients rather quickly, I've found a few great non-grocery store sources that save money in the long run:
  • Wheat Berries: I buy whole white wheat berries from the LDS Cannery (LDS is an acronym for the Church of Jesus Christ of Latter-day Saints. You don't have to be LDS to visit a cannery; just ask an LDS friend, like me, to take you). For a great explanation on the subtle differences between white wheat berries and red wheat berries, check out the blog Food Storage Made Easy. In a nutshell, white and red wheat are the same nutritionally but the white berries have a milder texture and taste, making your flour seem more like white refined flour. A 25-pound bag only costs $5.80!
  • Vital Wheat Gluten: This stuff is expensive at the grocery store. I buy it online from Honeyville Grain.
  • Yeast: Those tiny jars (or worse, envelopes) of active dry yeast are also really expensive at the grocery store. Costco sells 2-pound packages of yeast...I forget the price, but I'm pretty sure it was about the same as the 4-ounce jars!

Recipes:
Have I mentioned my favorite benefit to baking my own bread? It makes the entire house smell DELICIOUS! The best air freshener around!

Sunday, March 7, 2010

Diaper Plan Revised

Are you tired of reading about cloth diapers yet? Sorry. I remember how little I cared about this topic until I really opened my mind to it. Now that I've dragged you into this, though, I feel obligated to keep you posted. Don't worry, I will move on to different topics soon :).

Even before receiving my new gDiapers in the mail, I've decided to return them. I love the concept and have heard great things about the brand, but one feature has kept nagging at me ever since I clicked "Purchase". As I mentioned in my last post, the gDiapers have a cloth cover (not waterproof), a snap-in plastic lining, and a stay-dry cloth (or disposable) insert. You can rinse out the plastic liner if it becomes soiled and re-use along with the cover.

Similarly, the Flip Hybrid (waterproof) cover can be wiped and reused with each diaper change. It's basically the same concept, except with fewer pieces...a waterproof cover (plus insert) versus a cloth cover and plastic lining (plus insert). Fewer pieces = More husband-proof (am I right?).


I originally decided on the gDiapers because I thought that their fitted sizes would give a less bulky appearance than the Flip's one-size design. After reading TONS of positive reviews, though, everyone seems to be raving about the Flip's trim appearance. In fact, I've read very few complaints about the Flip in general, while gDiapers tend to get mixed reviews.

I am going to dip my toe in the water by buying one "Day Pack" to start with ($49.95). It includes two covers and six cloth inserts, and if you order from www.cottonbabies.com, they will throw in a free pack of disposable inserts and free shipping. If I decide to stick with the Flip system, I'll just need to buy another Day Pack for the toddler and eventually two Day Packs for the new baby, with some additional inserts. This is one of the most affordable cloth diapering systems available.


A couple more advantages of Flip:
  • The disposable inserts are cheap (remember, you choose whether to use a cloth or disposable insert. We'll use disposable inserts when traveling and possibly when I know Nick will be changing the next diaper, until he becomes more comfortable with cloth!). Flip disposable inserts are $0.28 each. The cheapo disposable diapers I currently use cost about $0.27 each. The gDiapers disposable inserts are $0.41 each if you buy a case.
  • The Flip disposable inserts are "dye free, fragrance free, and the only disposable insert that has achieved Oeko-Tex certification", containing only 3g SAP (in other words, better for Baby and for the environment than regular disposables). They're also compostable, but I'm not sure if I trust my compost pile that much!
  • Toddler and Baby will both be wearing the same diapers because of their one-size design. With gDiapers, I would have to organize my stash into small, medium, and large. Once Toddler is potty trained, Baby will have a huge stash of diapers all to himself, meaning less laundry for me.
  • The Flip cover can be used with any type of insert, prefold, or fitted diaper underneath. Just in case we find that the Flip cloth insert (or two) is still not enough to last my 12-hour-sleeper through the night, I could always buy a few fitted diapers to use under the Flip cover (something like this Kissaluvs contour diaper):
Kissaluvs Hybrid One Size Contour Diapers

So that's the new plan! I'll keep you posted, whether you like it or not :).

Wednesday, March 3, 2010

Diaper Decision

I did it. I just bought the cloth diapers. I hope we like them!

In case you're curious, I thought I would do a follow-up post detailing my decision-making process. I'm not going to list every diaper I considered, because this post would be 400 pages long. After weeks of (obsessive) research*, I limited my options to three systems.


This diaper will fit a baby from 7 to 35 pounds because of its adjustable snap design. You set the snaps to fit your baby and only adjust it when the baby grows, closing the diaper with velcro for each change. This diaper has a pocket where you stuff one or more cloth inserts for varying absorbency. They cost $17.95 each (including two inserts), with discounts for buying multiples.

I was completely sold on this system until I realized that I will have two babies in diapers for at least 6 months. While a one-size system would normally be more affordable (you just buy one set of diapers instead of three sets, size small, medium, and large), in my situation, I would need to buy more diapers. I estimate that I would need 24 diapers for the new baby (which will hopefully last 3 days between laundering) and an additional 12 diapers for the toddler. The cost of 36 diapers, including inserts, is $610.


Flip Hybrid by BumGenius-

This diaper is also a one-size system, fitting babies from 7 to 35 pounds. Each diaper includes a waterproof cover to which you add either a reusable cloth insert or a disposable insert for traveling. The waterproof shell can simply be wiped clean and worn again and again between washes. The waterproof covers (including an insert) cost $16.95 each and additional cloth inserts cost $4.95 each.

This is the most affordable system I considered. For two children wearing diapers, I would only need to buy 8 diapers (4 for the new baby and 4 for the toddler to get through 3 days between laundering, assuming one clean cover per day with a backup just in case) and 28 additional cloth inserts (for the new baby, 20 additional ones plus the 4 that come with the covers to get through 3 days, and for the toddler, 8 additional ones). The total for this system would be $274.


This is also a hybrid diaper, similar to the Flip. Each diaper includes a cover, a snap-in waterproof liner, and either a reusable cloth insert or a disposable (biodegradable/flushable) insert. This is not a one-size diaper, so you need to buy three complete sets: small, medium, and large. The covers (including two snap-in waterproof liners) cost between $11.66 and $18.99 each, depending on color/pattern and whether you buy multiples at once. Additional cloth liners cost $2.50 each.

With this system, I would need to buy 4 covers in each size plus 24 cloth inserts for size small and 12 cloth inserts for sizes medium and large. I won't go into the details of the discounts offered for buying "starter packs", but it made more sense to buy 6 small covers and 24 small inserts (totaling $169), 6 medium covers ($70), 6 large covers and 12 medium/large inserts (totaling $109). The total for the entire system is $348.


In the end, I actually didn't go with the cheapest option. I went with the gDiapers, and the reason is somewhat embarrassing....they're cuter! The one-size diapers tend to look pretty bulky on a newborn, but the gDiapers provide a more fitted look. I figure that since I will potentially be saving thousands of dollars in the long run, I can pay an additional $74 up front for the cuteness factor :).

Accessories purchased:


Bum Genius Diaper Sprayer-

PlanetWise Diaper Pail Liners ($16.50 each, I bought two)

Planet Wise Pail Liners-


TOTAL SPENT TO SWITCH TO CLOTH DIAPERS: $425.95
(Although the start-up costs were only about $187 including the size large gDiapers, inserts, and accessories. I'll buy size small and medium later, assuming I like them).

I will be sure to let you know how it works out!

*The Colorado Springs based online store, A Diaper Change, was very helpful in my decision making process. Their prices, which are competitive, are the prices quoted here.

Monday, March 1, 2010

Cloth Diapers?

I am considering a switch to cloth diapers, and I will explain why in a moment, but there are so many options available that I could really use some help making sense of it all. I've been asking around, and it turns out that I don't know a single mom who uses cloth. Maybe, just maybe, someone will come across my blog and be able to give me some advice?

Bum Genius One-Size 3.0-Bum Genius One-Size Pocket Diaper Flip Hybrid by BumGenius- good vibe stripe little gPants girly girl ruffle little gPants Gussetted for ULTIMATE Leak Protection CushyToosh Cloth PUL Pocket Diaper with Super Absorbant TRIPLE THICK SHERPA SUPERSOFT Insert JUST SAY NO TO MICROFIBER....SQUISHY
Images courtesy of BumGenius, gDiapers, and CushyToosh.

OK, so here's the story: I love disposables. I buy the cheapo store-brand ones at King Soopers (well, the store-brand ones that are chlorine-free, so they are the second cheapest option), and have never had a problem with them. They're convenient and affordable and don't seem to affect Baby's skin negatively. Last summer, however, Baby started getting a recurring diaper rash (too much information? Sorry, this is a mommy blog after all). Her doctor suggested that we start using wet washcloths instead of disposable wipes, because the wipes contain tons of chemicals that can irritate sensitive skin. I made the switch and fell in love with my new cloth wipes. My mom helped me sew really cute ones with flannel on one side and a soft terry cloth fabric on the other. I keep a solution of water, aloe vera juice, tea tree oil, and baby oil near the changing table and wet each wipe before use. Her diaper rash immediately cleared up and it actually made diaper changes a more pleasant experience for both of us (the new wipes are better at getting the job done, too, so I only need one or two instead of 45 disposables per diaper change).

A couple months ago, I got lazy (actually, I got morning sickness) and switched back to disposable wipes. Within a week, her diaper rash was back in full force. Once I switched back to cloth, it was gone almost immediately. Now I'm totally sold.


I'm already doing extra laundry for the cloth wipes. It kills me to run a nearly empty load of laundry, since I don't want to combine them with our other clothes. I finally realized that switching to cloth diapers would actually simplify my routine at this point. Rather than keep two separate diaper pails (I have one for disposable diapers and a little one for the cloth wipes), I can just throw all the cloth into one pail. I'm already doing extra laundry, so I can just throw the diapers in with the wipes. No extra work!

Plus, I'll theoretically save a bunch of money in the long run by switching to cloth. I've found estimates online that for the cheapest disposables, you'll pay about $1200 from birth to potty training for one child, which lines up pretty closely to my own math. The cost of cloth diapers vary greatly, but I am considering a higher-end system that would total about $500. Ouch, that hurts to fork out up front, but in the long run, it's still significantly cheaper than disposables. Plus, I can use these diapers for multiple children (if we decide to have a third child down the road), and sell them for about half what I paid new. Seriously, people buy used cloth diapers in good condition all the time. What do I have to lose?

Well, I have about $500 to lose. What if I hate them?

Here is where you come in, my wonderful readers. If you use cloth, I would love to hear your opinion. I am fully expecting to not receive a single comment on this post, though, with the luck I've had so far just asking around!
  • What's your favorite brand?
  • Have you tried a WAHM-produced diaper, maybe sold on Etsy, or is it wise to stick with the bigger brands, like BumGenius?
  • Have you tried a hybrid diaper? gDiaper and BumGenius both make hybrids that allow for either a biodegradable/flushable disposable or cloth insert.
  • Do the one-size diapers look really bulky on a newborn? Is it worth it to buy a system with small, medium, and large, even though you have to buy three times as many diapers in the long run?
  • Are the all-in-one diapers really that much more convenient than a pocket/all-in-two diaper? Is it nasty to pull the soiled inserts out of the pocket diapers?
  • How did you convince your husband that this was a good idea? :)
Any other advice would be greatly appreciated. Thanks a million!